Testing one, two, three. Is this thing on? Okay, so you did it. You have a great podcast idea. You know, you always wanted to start a podcast that you finally jumped into it. You have a great name, and you even have some topics that you know you’re going to cover, and you may even already have your cover art.
You’re good to go. Awesome. So, you start looking into, “how do I even start a podcast”? And then, eventually, you may have landed on something like Anchor which, by the way, my podcast Voluntary Input, if you didn’t know, is an Anchor podcast and Anchor is absolutely awesome.
And for me personally, it is the easiest way that I found to start a podcast because the simple thing about Anchor is first and foremost, it’s free. You can’t beat that! And secondly, Anchor does all your distribution for you. So when you sign up, as you may have learned, and you record your first episode, Anchor immediately starts working on distributing your podcast for you.
So you don’t have to do all that heavy lifting in the background. I don’t know if you guys have ever looked into how you distribute a podcast. Of course, you can do it yourself. It’s not impossible but it can be a little tedious and tricky. But like I said, the cool thing about Anchor is that they do all this for you.
All you have to do is create – which is what you want to focus on in the first place, right? You just want to record your podcast and get it out there. Awesome. Great. So again, you find the likes of Anchor. And yes, there are other services that are similar to Anchor.
I’m just partial to Anchor because it’s what I’ve been using for a long time now and I think it’s just simply easy and I love easy. That’s me. I don’t know about you but that’s what I love. I just love things to be simple and easy.
So you finally get to the point where you’re going to record your first episode.
And you think? Well, Anchor says I can do it right here on my phone. And then you do and you record your first episode or you’re sitting at your laptop and Anchor also says that you can record your episode right here. And so you go through recording your episode.
You hit all your points that you want to hit on your first episode. You think it’s great and it probably is. Your content is awesome. You get it all wrapped up. You even use some of Anchor’s tools – adding some background music, a theme song or some transitions. and you get it published.
The first thing you do is tell people about it, and you get people listening. Hopefully you get your friends listening, or a close friend or family member listening first ( but that’s another topic for another day) as to who you should. Let them listen to your episodes first. But anyway you let people listen or you invite other podcasters to check out your show and ask them to tell you what they think.
Now, for the most part you are going to get some genuine feedback. You’re gonna hear things like, “Man, your show was great! I love your content!”
You may get these comments, but you may also hear that your sound could be better. You know, people will try to be nice to you which is awesome. They’ll tell you the show itself was great, “But it’s just your sound, you know – it’s off”, and you may have noticed this yourself anyway because you probably already listened to a bunch of other podcasts, including some fellow Anchor podcasts.
And you think to yourself, “Wow, they sound great. I’m going to do whatever it is they’re doing too.” But then you notice that when you record, yours doesn’t sound as good as theirs does, and so then you try to look into why this is.
Let me give you the first truth that you have to understand about this.
First and foremost, those podcasts that you’re listening to, whether hosted and distributed by Anchor or not, the reason why they sound so good is they are not recording on anchor. In fact, they’re not recording on their cell phones. And they’re most likely not recording per se on their laptop.
The way you were doing it, where you just opened your laptop, went to the anchor website and started recording, they are not doing those things. And why is that? Well, that’s the heart of what I’m going to talk about with you today: equipment. Truth be told, you may have already realized while they’re using something different than you’re using.
And why is that? Well, let’s start with your laptop. More specifically, let’s start with the microphone in your laptop. You have to remember this simple thing about that, first and foremost – the microphone on your laptop was not intended for long form recording like a podcast. That’s right. So when you go to buy a laptop, there’s a gamut of them. There’s HP, there’s Chromebooks, there’s Dell, and so on and so on.
When those manufacturers are designing and building those laptops,they’re not thinking, “Oh and we’d better put a really good microphone in there because someone’s gonna be recording a podcast.” And no, not even Apple. So, if you’re thinking, “Well I’m going to go buy a Macbook because if I spend the money, and since everyone says the MacBooks are the best, I’m gonna get this great microphone to record my podcast.” No, you’re not. Because again, even with Apple, they are not focusing on the microphone. Then why are there microphones in laptops? Because those microphones are intended for things like short meetings or Zoom calls, Skype, and other things like that. Even long before those things existed microphones were put in laptops, only for short form recording or for conversations.
They are not intended for podcasts. They’re not intended for musicians. No one was intending to use a laptop microphone for this sort of recording.
Okay? You get that, and I don’t want to keep beating that point to death, but the same thing also applies to your phone.
You think, “Well, I recorded my podcast on my phone through the Anchor app, like a lot of other podcasters are doing right?” No. The podcasts that you’re listening to that sound really, really goodare not recording their podcasts on their phones. Because again, the microphone in your phone was not intended for long form recording.
When Apple is making the iPhone, or when Google is making the Pixel phone, or when LG or Samsung, or whoever or any of the Android phone models – when these companies are making these cell phones and they’re putting in microphones, they are not thinking about long-form recording.
Guess what? The microphone in your phone is for phone calls. Remember, phone calls? Yeah, I know. I just wanted to throw that in there on purpose because it seems nowadays most people don’t even make phone calls. Heck, I know people who barely even know how to talk on the phone anymore. But again that’s another topic for another day,
The point here being that the microphone in your phone was not intended for long form recording. It is not intended for podcasting.
But let’s say you figured that out.You’re like, “Yeah apparently that’s not what they’re doing.” Then you start seeing these podcasters either posting pictures of themselves in recording sessions. or they may even stream their recording sessions.
And you notice they’re using these great microphones, and they’re using these great mixers. And you start thinking, “Well, maybe I should get something like that”, and you start looking into it, You notice podcasters using popular pieces of equipment like the Rodecaster Pro, or the GoLXR or GoLXR Mini, which actually mostly gamers use but podcasters use them as well. In fact, I used the GoXLR for a long time myself. Finally you decide to grab one of those for yourself, and then it hits you. You look into it and you get sticker shock because the fact of the matter is, these things are expensive. They’re not cheap and you’re just starting out, and you’re probably on a shoestring budget. If you even have a budget at all.
And so, you begin feeling a little defeated at that point, so then you think, “Well, maybe I’ll go to eBay.” I want to caution you – do not go to eBay for these types of pieces of equipment. Because what you’re gonna find, especially in the case of something like a Rodecaster Pro, many people are listing them at retail cost.
If you finally decide to buy one, you’re going to want to buy it new. Thus, if you’re going to buy a Rodecaster Pro, go to a retailer like Sweetwater, or purchase it directly from Rode. Do not buy them from eBay because if you buy it off someone on eBay, you’re most likely not going to get things like the warranty. But most of all, if you’re going to pay retail price for something like that, why buy it off of someone?
But let’s say you’re not even anywhere close to affording that type of equipment, but you still want to get great sound. How do you go about doing that?
Let’s start with microphones. You may have already researched microphones and you notice that the microphones that a lot of more established podcasters are using are a bit more expensive than you even considered. There are the popular Shure microphones, the Rode microphones, and whatnot. Yes – these microphones can be on the expensive side of things.
You find yourself thinking once again, “Gosh, I can’t even afford those.” You realize your computer has USB ports, so you look into buying a USB microphone. This was the first thing I did as well, and I even did a blog post about the USB microphones I liked from FiFine which is a great USB microphone for only $20.

But what you’ll quickly discover is, once you get a USB microphone and you plug it into your computer it doesn’t work. But why is that? Well, because USB ports are not intended for audio. USB ports do not power microphones. They are for the transfer of data, between the computer and things like flash drives or external hard drives. Not for audio pickup.
In fact, when I first started my podcast, that’s exactly what I used. I used Voicemeter and then I went on to Voicemeter Potato, (which I know sounds funny, but that’s what it’s called) and it worked out great. If you’re going to go the USB microphone route, it even has a built-in virtual tape deck that looks like an actual cassette tape. You can actually do all of your recording there.
So what do you do? Well, you can find yourself an audio interface that will make this work. There are free solutions available. There are free options out there. You may hear of something called Voicemeter, which is actually a great audio interface for using USB microphones.
But here’s the problem that you may run into there. Voicemeter requires a bit of a technical learning curve that you may not be into. Keep in mind there are some great YouTube videos out there, from set up how-tos as well as tweaks and best practices. This may work for you.
If you have that kind of time and patience, you’re going to relegate a laptop for recording your podcast, this may work out for you so you get yourself a USB microphone and set up Voicemeeter. Like I said, this was my setup for some time when I first started out – I carried a backpack with a laptop, and a few FiFine USB microphones. This may be your jam as well. But again if that’s not you, what do you do?
So this brings me to my main point. You can absolutely get good sound quality for your podcast for a little over a hundred bucks )and even cheaper in some instances). But how do you do that?
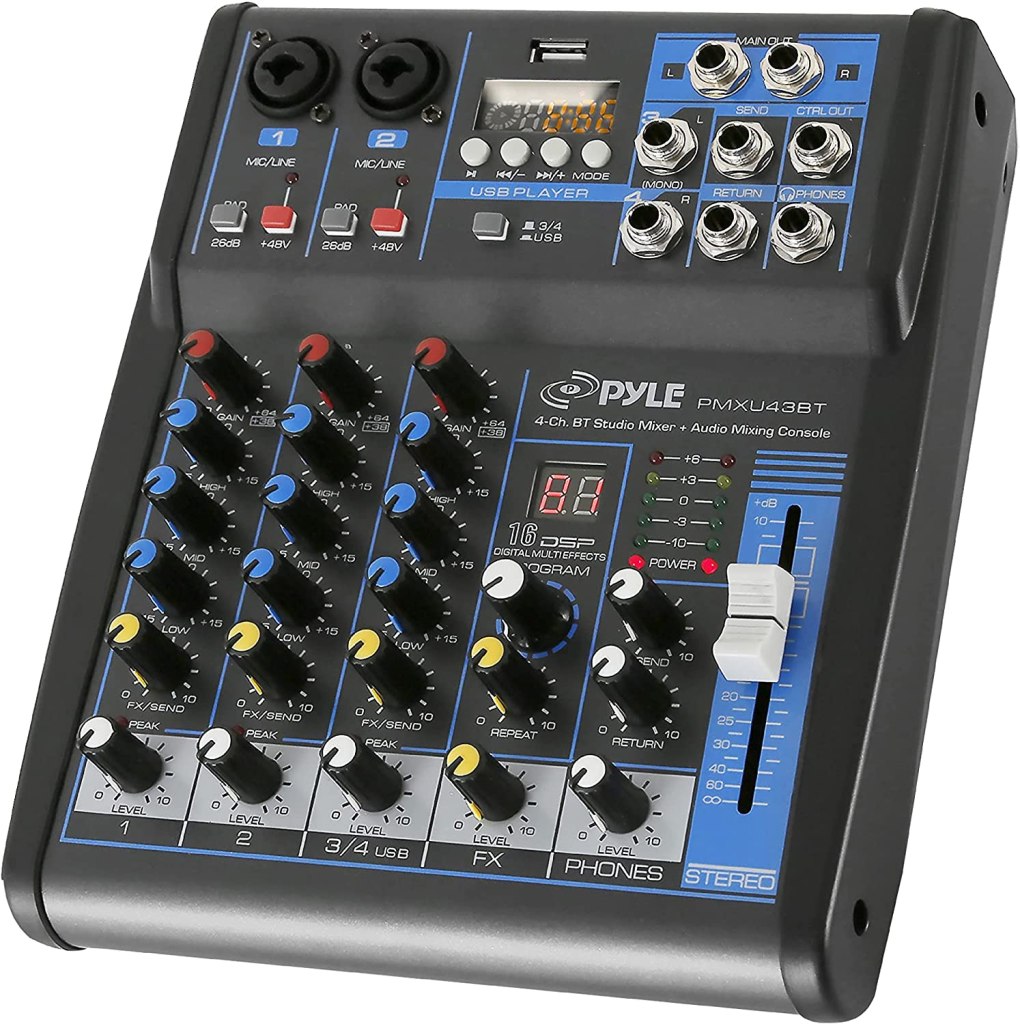
Well, first and foremost. grab yourself an audio mixer. The mixing panel I tend to suggest when asked for help is the Pyle PMXU43BT. First and foremost Pyle does not sponsor me. It would be great if they did, but they do not sponsor me.
I am receiving no money dollars from them, but this is the kind of thing you’re going to want to purchase. If you want to get that great sound quality without breaking your bank. If you’re on a tight budget or if you, like me when I started out, have no real budget.
A quick side note to that – If you ever go to, or listen to and podcast startup workshops, one of the first things they’re gonna tell you is that you should have a startup budget. Create a budget stick within it. I do believe this is smart, but when I first started out, I didn’t start with a budget because I kind of knew what I was gonna be doing jumping in, and because quite simply it’s just the kind of nerd. I am, I already had some of this stuff laying around, so I didn’t really jump in with a budget.
Not that I’m rich by any stretch of the imagination, but I knew what I needed and I knew I could afford it. And as I mentioned, I already had some things on hand.
The best thing about this Pyle mixer, first and foremost, is that you can get a brand new one for $72.39 on Amazon. Even better than that, you can go to eBay, where I’ve seen them as low at $48. Now, remember earlier I told you don’t go to eBay to buy something like a Rodecaster Pro?
The reason being is that’s an entirely different ball game. The likes of the Rodecaster Pro or the GoXLR are entirely different pieces of machinery. Simply put, they are not your typical run of the mill audio mixers. Those are higher end pieces of electronic equipment, is the simplest way I can put, But when you are looking for a mixer like the Pyle mixer I’m referring to here, by all means you can hit up eBay because you’re more than likely going to get one that functions without running the risk of being out of loads of money.
Simply put, these mixers are your “basic mixers”. They’re not super fancy, but they get the job done and offer a good range of useful features. There’s no electronic PC interface. They’re not that higher end piece of electronic equipment like the more expensive offerings mentioned previously. So, how do you go about recording your podcast?
Well, here’s one of the beauties of this mixer and why I would tell you to get it when you’re first getting established. You’re gonna do all your recording on the mixer using a simple USB flash drive. You put the flash drive in the mixer and you hit record. You’re done. You’re good to go.
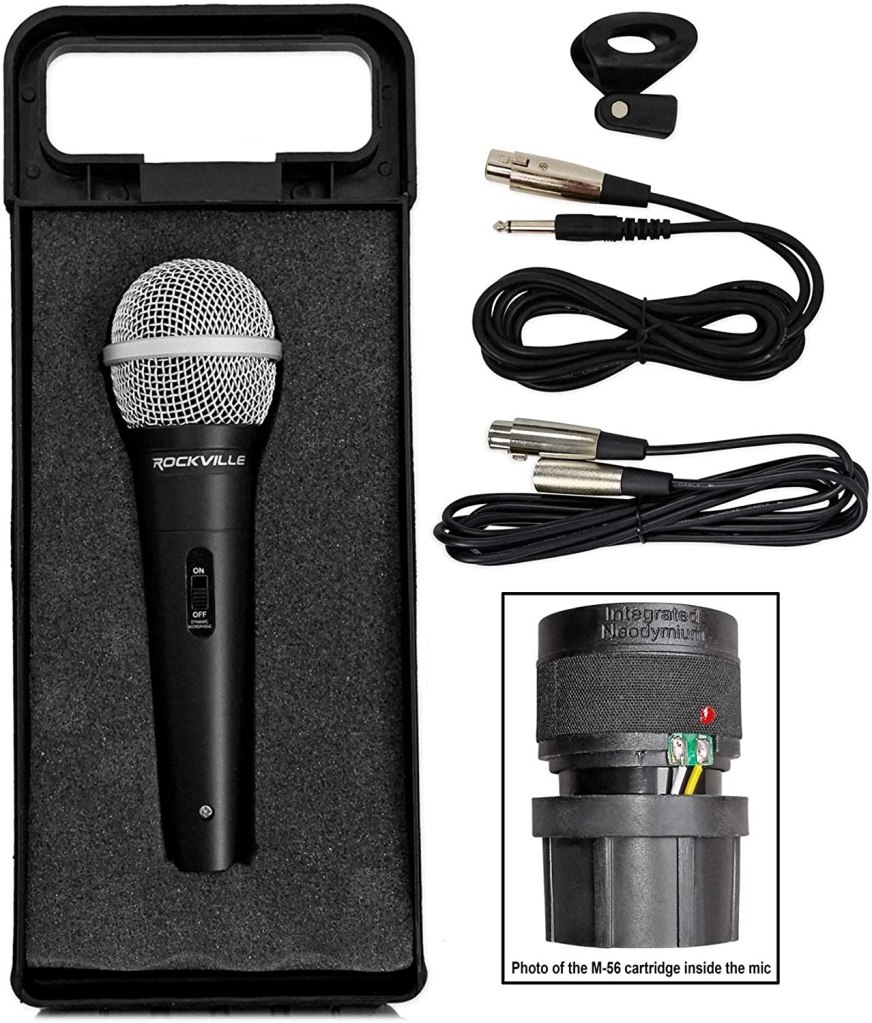
This mixer uses 2 XLR microphones, so just in case you have a guest one day you’ll need another microphone. We’ll get more into XLR microphones at a later date, but I always suggest that you get XLR microphones. You’re gonna get better sound quality with XLR microphones. Yes, there are some great microphones out there using the 3.5 millimeter jack, but the audio standard in most of the audio world is going to be an XLR microphone. You can look up all the tech specs as to why that is on your own time but I’m not gonna go into all of that here. And the great news is you can pick up a Rockville XLR on Amazon for just $24.95.
One great thing about this mixer is that it has built-in equalization, allowing you to make adjustments and tweaks to your overall sound giving you that great sound quality you’re striving for. You can add or remove base, treble, and midrange, depending on how your voice sounds.
There’s even effects. You can add echoes, reverbs and so on If you want to if you’d like to add such things to your podcast.
Remember a little earlier on I said to you that when you first start your podcast, you’re going to want to let someone else listen to it first. like a friend or a family member. This is a good standard practice for all podcasts, regardless of what level you’re starting in.
You’re going to want to have someone that you love and trust listen to it first, and for several reasons. Specifically, you’re going to want to ask them things like, “Am I clear on what I’m talking about? Does it make sense, and is it coherent? Do you think this is a show that, if you did know me, would you come back and keep listening?” You’re going to want to ask things like that because you’re going to want to ask someone close to you that you love and trust to get their honest opinion.
I’m not gonna lie to you, I just jumped in and to be honest my feelings didn’t get hurt. But if you look around the podcast community, especially if you look into the bigger, more established indie podcasts on up to large network podcasts, they’re gonna want to tell you that yes, you’re going to want to get that honest feedback first before you continue forward. But hey – you do you. But I do agree with this approach overall and I suggest getting that honest feedback if you can.
Another reason why you’re going to want to have someone listen first is that when you power up the mixer, you’re going to notice the sound is muffled and quiet. That’s because when you buy this mixer and first take it out of the box, you have to set it up to fit the sound of your voice.
As a matter of fact, when you first take it out the box, all of the EQ settings are set to 0. You’ll need to hook up your mic and headphones, and begin speaking until you hear the sound you’re looking for while making necessary EQ adjustments. Then, make a recording of yourself speaking. Try reading a passage from a book or a news article. Record yourself speaking as you plan to do on your podcast going forward.
Then. take that recording that you just made on your flash drive and either have that trusted family member or friend listen to it directly there or give them the flash drive and ask them to plug it into their computer to take a listen and tell you how you sound.
Because another important thing I’ve learned over the years from audiologists and other sound professionals is that the way we hear ourselves when we speak isn’t actually how others hear us. This is why a lot of times people say they hate the sound of their voice whenever they hear themselves speak on recordings. There is nothing wrong with the sound of your voice. Trust me, You sound great, but if you start messing with equalization, you may tweak it to a point of where you think you sound and it may actually sound odd. Just remember the way you think you sound, the way you hear yourself, isn’t always the way everyone else hears you – the way you actually sound. So you’re going to want the person you have doing the listening test for to tell you if the EQ adjustments you’ve made sound true to the sound of your voice.
Now granted you may not get it 100% perfect and that’s fine. But actually, what you’re looking for is you want that person to give you that honest feedback.
So now that you’ve got the mixer, you’ve got the microphone, you’ve got everything EQ’d out properly, you sound good – your friend or family member has told you that you sound good. Go ahead and record your next episode. Do the full recording. Once you’re done, unless you want to do this, I would suggest don’t just pop that flash drive in your computer and start uploading it up to anchor because the thing is that even though Anchor, offers editing tools, you may notice that it can be a bit cumbersome and a little more time-consuming than you’d like. What you’re going to want to do is use a free audio editing tool that you probably may already be using, or you may have noticed that the vast majority of podcasters use this.
I’m of course referring to Audacity, It is free, simple, and loaded with all kinds of tools. A lot of tools you may not even understand but you don’t need to understand them all for it to be a very powerful and useful tool to have in your podcast arsenal. There are plenty of great tutorials to help you get started with the basics, and you may hopefully learn in time.
In fact, later on at some point we’re gonna do a deep dive into audacity, exploring some of the tips and tricks that I think are helpful to podcasters and absolutely help me all the time. But first and foremost, go ahead and plug that USB drive into your computer and get Audacity loaded up.
When you open audacity, all you have to do is go to file and import and have it import the audio off of your USB drive into itself. This is where you’re going to edit your episode. This is where you’re gonna do all of those things (and more) you were trying to do on Anchor and may have gotten frustrated.
Now again we’ll do a deeper dive into Audacity and all of the awesome editing tools that you can use that you may not even be aware of. But for the most part, let’s say there’s a whole segment that you don’t want in your podcast. With Audacity, you can simply highlight it and delete it.
Once you’re finished with all of your editing, you simply select “file” and export as mp3. You can name it and enter any details in the detail window that comes up and then you export it onto your computer as an mp3. Then, you’ll upload the exported file (or files if you have more than one to add to an episode) to Anchor. Again – we’ll do a deeper dive into all of this at a later date. The purpose of this article is to get you some affordable audio equipment to get the quality sounding podcast that you hope for.
I hope this info helps. If you have any questions or comments, please don’t hesitate to visit Voluntary Input and select “Contact”. We’d love to hear from you!

I’ve thought about getting into podcasting. Good review!
LikeLike
Thank you! I’m glad you enjoyed it and I hope it was helpful. If you decide to finally start one and need help, please don’t hesitate to reach out!
LikeLike